Showing posts with label makeover. Show all posts

Tuesday, May 18, 2010

Shoe Makeover 2.0

My original shoe makeover ended up being a bit of a disaster: the glue gun was not as powerful as I'd expected and I lost one decoration on the train a few days after I made it.  Luckily the original gemstones had been sewn on so there were already holes in the leather that I could sew through.  I whipped up these flowers (using an upholstery sample--no fraying!) and had whole new shoes in less than 30 minutes!

Tuesday, March 30, 2010

Old Lady Shoe Makeover

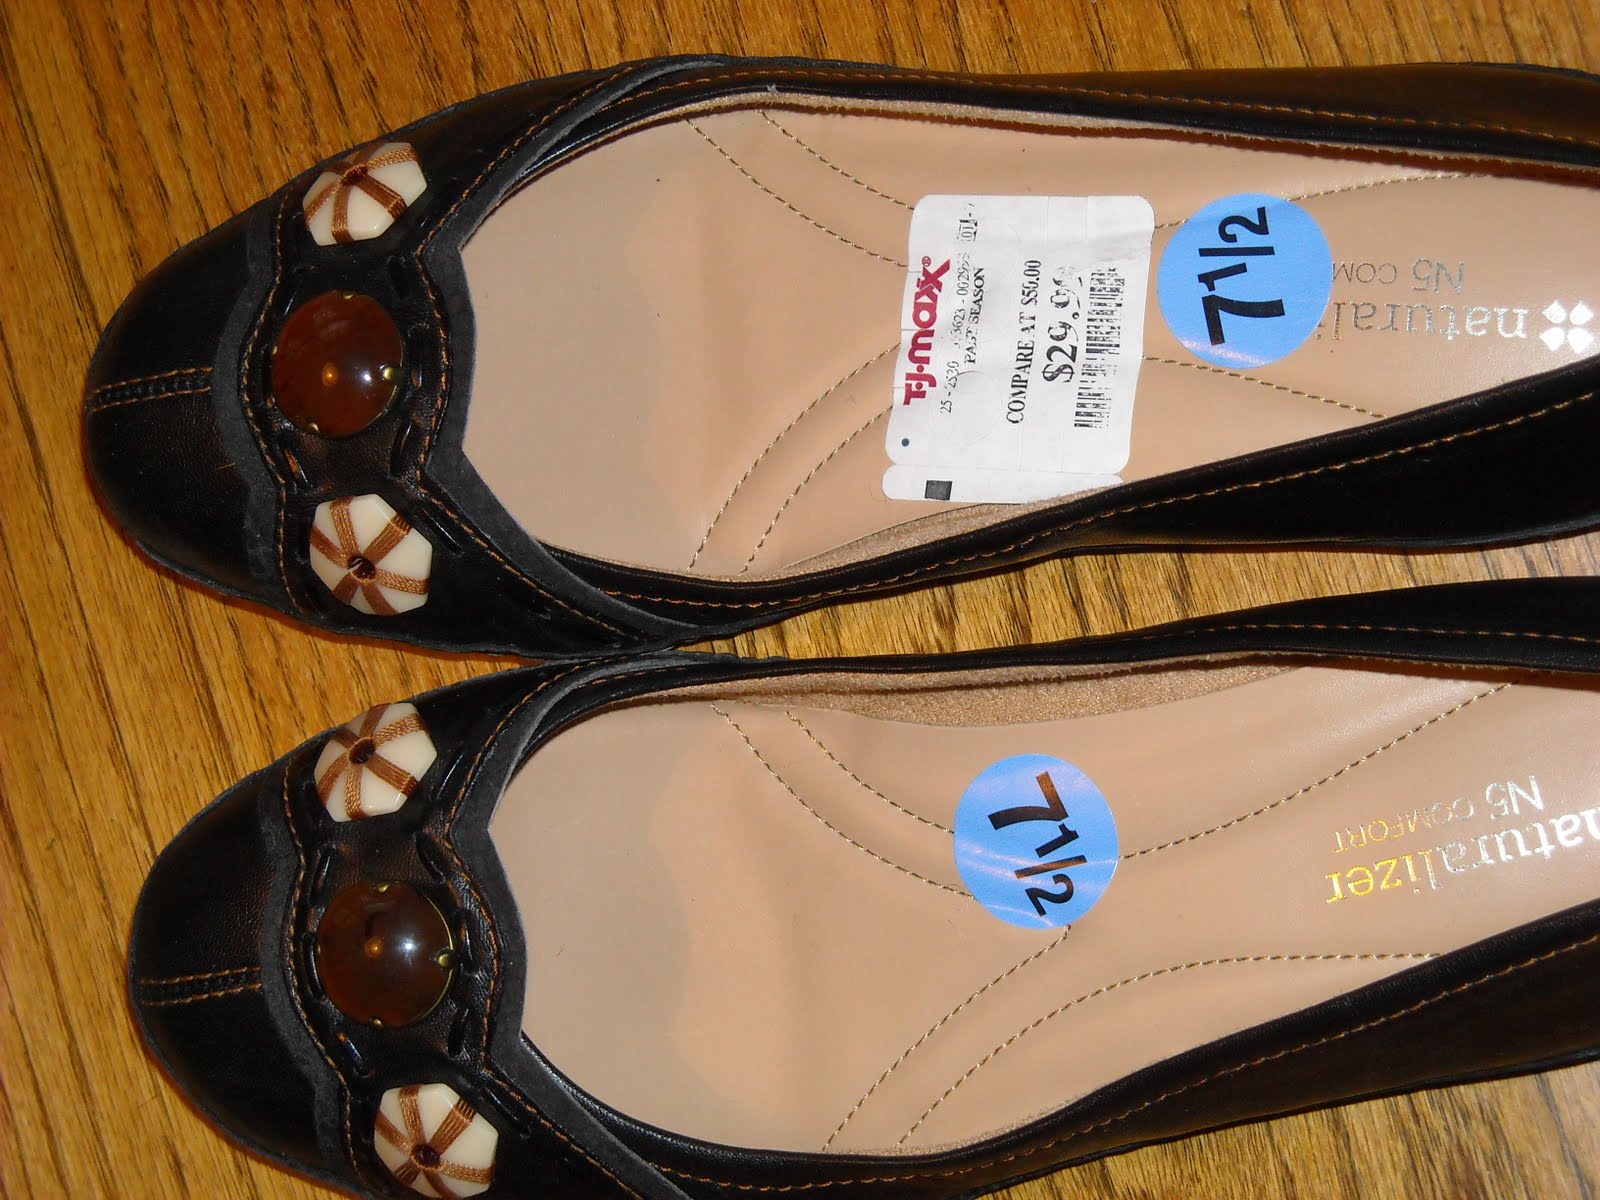
I have the hardest time finding spring/summer shoes that are comfy and cute.  I love slip-on/ballet flat style shoes but lately I've noticed that the lack of support makes my feet ache by the end of the day.  I found these shoes at T.J.Maxx for a very reasonable price.  I like the shape and support but hate the awful fake gemstone things.
So I decided to make them over and was inspired by these shoes:
Blume leather ballet flats from J.Crew

I cut off the stones and made a miniature version of the flower corsage from Made by Lex.  Using my brand new mini glue gun I glued it to the top of the shoe.
The best part of this makeover is that if I get sick of this color/style (or it gets dirty) I can just pull it off and put on something new!  I like this ruffle option as well:

And I think that one large flower with few petals, like the one on this headband, would work well also:
Large flower headband by Made by Lex

Now I'm ready for the 80 degree weather this weekend!
 
PS-After wearing these shoes out one day the fraying got out of control so I sealed the edges with a candle.
PPS-After having worn these for a couple of days I realized that the glue is not enough to keep the fabric on the shoe (the roses however are still firmly attached to the strip of fabric).  There are holes in the leather where the original decorations were sewn on, so I did a few hand stitches to secure the flowers.

Saturday, February 13, 2010

Snow Day Sweater Dress Makeover

 
The record-setting snow storm that hit the mid-Atlantic this week gave me 2 snow days (!!!) and plenty of time to work on my newest project--except for the 3 hours we lost power Wednesday afternoon.  The snow was absolutely beautiful but after the 15 inches we had last weekend I wasn't even tempted to go out and play.
I've had this gray sweater dress from Express for about 3-4 years now and it's always bothered me to wear it.  I always get compliments when I do but its so overwhelmingly gray and the long sleeves annoy me, plus its kind of itchy.  I decided to spruce it up and change the neckline, since boat collars don't really work for me.
 
I based the idea for the new shape of the dress on this Butterick pattern (that I own but haven't made yet).  I obviously really like this purple broadcloth fabric (since I've used it in the past 3 of 4 projects) and I like the purple-gray combination.  To give the dress a little more flair I decided to use the belt as a ruffle that would just peek out of the side of the purple strips.

I started off by shortening the sleeves to 3/4 length.  I simply measured how long I wanted them to be, cut, and reattached the original cuff.  In order to get the sleeve to fit in the cuff I had to baste it and gather it a bit.
 
Next I prepared the purple strips and the ruffles.  I decided that I wanted the waist band to be about 3" wide (I checked other dresses I own with waistbands), and knew that I would want the 2 strips that make up the collar to form a strip the same width when they joined in the middle.  Therefore the collar strip would be 1.5", joining at the bottom of the v-neck to form a 3" strip.  I marked the design on my dress with chalk, which may give you a better idea of this.
For the waist I cut a strip 4" by 33", and did a double fold hem of about 1/2" on each side.  For the collar I cut a strip 2.5" by 44" and only folded over once (since it was going to be completely attached to the shirt anyway).  Now may be a good time to say that once I was partway through this project I realized that my dress was very stretchy, while the broadcloth was not.  I knew this would cause problems if I attached the waistband all the way around, as I probably wouldn't be able to get the dress over my head and shoulders.  So I decided to leave the waistband unattached in the back, and I'll show you the rest of my solution a bit later on.

After cutting the purple strips I was ready to prepare the gray ruffles.  I cut the belt in half (it ended up being 1" by 67").  I decided to use 1.5 times the length of the purple strips for the ruffles, so I used 1 strip for the collar, 3/4 of one for the top of the waistband, and the rest plus some extra strips I cut from the leftover sleeve material for the bottom of the waistband.  I then made a ruffle with each long strip, gathering them enough so that they were the same length as the purple strips.
Next came the pinning...and repinning...and more pinning.  And between each step trying on the dress and getting hundreds of tiny stabs and scratches.  My arms look like I was mauled by a very weak and dull-clawed kitten.  But I finally got both sides of the collar pinned correctly and I sewed very close to the edge, slightly overlapping the 2 strips in the middle. 
The final step was to add the waistband.  As I said earlier I realized that I would never be able to get the dress on if I attached it all the way around, so I decided to leave it unattached on the back.  In order to do this I first pinned the front and 2 inches around the back.
Then I hemmed the top and bottom of the waistband that were not attached to the dress, going right up to where it would join the dress but being careful not to go too far.  I left the ends unhemmed since I knew I would have to remeasure and do them last, once everything else was in place.  Next I sewed the waistband top and bottom to the dress and tried it on.  Luckily I'd left enough room in the back and was able to get it on!  With the help of my boyfriend (who marked where the 2 ends should meet) I was able to finish the back, hemming the edges and adding 3 hooks and eyes so that once the dress is on the belt can be "buckled" in place.
This is what the back looks like when the dress is on.  By looking at it when its off you can see just how much the dress stretches!
I'm really happy with the way this dress turned out and it was definitely a great way to spend my snow days!  You may not be able to tell but the waistband and vertical strip only ended up being about 2 1/4 inches wide, instead of the 3 I was going for.  I must have used more fabric than I meant to when hemming.  And even though this didn't really help the itchiness problem I'm sure I'll wear it more than I did before!

Monday, February 1, 2010

Sweater Makeover


I've had this sweater for a few years but don't wear it very often - I love the color but it was a bit too big and not very flattering (sorry no before picture).  I decided to fix the shape and update it, and I was inspired by this J.Crew sweater.

To bring in the sides I turned it inside out and first pinned, then basted, a line starting at the underarms, curving in at my waist and curving back out to meet the bottom hem.  It might be hard to see in the picture below but this is the final seam.  I've used this technique a couple of times now (including on a Banana Republic dress on huge sale that was 2 sizes too big for me!) and as long as I pin and baste before sewing the actual seam it works very well.


I used a thick broadcloth fabric for the ruffle, as I just happened to have that nice purple color lying around!  To make the ruffle I cut a long strip (probably about a yard long) 4 inches wide, then folded it in half lengthwise with the right sides together, sewed one short end closed and down the long side.  Then came the time-consuming process of turning the fabric tube right side out (this time I used a knife sharpener with rounded top which worked pretty well).


Once the tube was right side out I pressed it flat and ruffled it.  To do this I sewed 2 rows down the middle, being sure not to overlap them, with the tension set to the highest number and the stitch length as long as possible.


Sewing 2 rows is helpful when ruffling thicker fabrics, and also helps to more evenly distribute the ruffles.  Then you just pull the strings and move the ruffles to evenly distribute them along the strip.


I then pinned the ruffle to the sweater, being sure to keep the sweater itself flat, then sewed in place.


I started with just the shoulder ruffle, like the J.Crew sweater, but thought it would be fun to add more.  I remembered seeing this shirt by Alexis of Made by Lex and liked the idea of a shape/line that continued onto the back of the sweater, so I added a squiggly circle on the side that curves around the back (in the picture it's laying flat but you can see where the side seam is, about a third of the way in from the left side).


This project was really easy and I was able to finish it in one evening and wear the sweater to work the next day!  The longest step was turning the ruffle inside out and then forming the ruffle.  Definitely a fun and easy project that makes you feel like you have a whole new piece in your wardrobe!

Friday, January 29, 2010

Welcome

I can't believe I'm embarking on a new blogging project so soon after starting up my first blog ever with my friend Laura!  I've been sewing for about 6 months now and absolutely love it.  I can't take much credit for original ideas but I've found some amazing tutorials and designs on various blogs and have just started using patterns.  I'll be posting lots of pictures of my finished projects, as well as some tutorials.  Now that I have a job I have a lot less time to spend sewing, but I hope to have a new post every week or so.

Here are some of my past creations:
 
  
This was an old shirt from H&M to which I added the pleats around the collar, somewhat inspired by this J.Crew shirt.  I used fray check on the edges, not realizing that it would leave a slight mark, but I don't think you can really tell.
 
My first petal t-shirt.
 
  
This shirt was entirely my own design and I'm pretty proud of it.  The bib collar thing took forever between the ruffles and pleats but I love how it turned out.  My boyfriend's mom showed me how to do the sleeves and that has been an invaluable lesson...just reading about how to attach them does nothing to clarify the process!
 
This is my newest shirt, made from a pattern.  I think I could have easily done it without one, although the whole neck interfacing piece was new to me.  It's just a pretty simple shirt with pleats at the neck, but I love the crazy fabric!