Wednesday, May 18, 2011

Spring Top Voting and a Quick Update

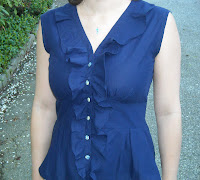
I've made it to the Wednesday round of Made by Rae's Spring Top Sewalong!  She had over 300 entries this year so I'm really excited to have made it to the finals.  Please vote for me TODAY (Dots of Liberty by Laurel)!  Here's my final top:


I used Simplicty 2601 View B but instead of having the ruffle collar go all the way around I made 2 separate pieces and sewed them into the shoulder seams (using this Boden shirt as inspiration).  The back of the collar and armholes I finished with Tasia's amazing bias binding technique in a fun patterned fabric (sorry no pictures).  I called it Dots of Liberty because I used some beautiful Liberty of London covered buttons that I got in England last year.  As you can see in the second picture I ended up having to take in the back, but I really like the effect the pleat gives so it worked out just fine.  This was my first successful attempt at buttonholes (after trying them as a beginner I'd convinced myself that my machine couldn't make them).  They're much easier than I ever would have thought!

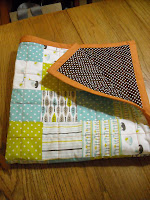
I've been busy sewing (and taking classes and planning a wedding and changing jobs!) and successfully finished my first quilt earlier this year for my soon-to-be nephew.  I'm really happy with how it turned out and he apparently loves to roll around and spit up on it so everyone is happy.


I used this fat quarter bundle from Spool (but with elephant fabric instead of birds) and polka dot fabric for the backing from Joann's.

I've also made a bunch of tops using Simplicity 2892 View C.  This one is my favorite with a cotton voile also from Spool (I entered it in the contest as well but it didn't get chosen).


And the biggest project on the horizon--my wedding dress and bridesmaid dresses!  I've been really enjoying Suzanne's updates on her wedding dress progress.  I'm still playing around with what style I want (still have plenty of time before the wedding) but am hoping to work on muslins this summer and finish it up as much as possible before classes start back in the fall.

Don't forget to vote for me TODAY!  Thanks!
Monday, September 6, 2010

Dot Dress & Hiatus

My end of summer project was McCall's 5845, a fairly basic sheath dress with a low back that will be great for work.  I've had this dot fabric since I started sewing but was never sure what to make with it.  This dot top/black skirt combination reminds me of (and was probably unknowingly inspired by) Assorted Notions' version of the coffee date dress.
The only thing I changed from the pattern was to raise the back about 3 inches so that it will cover my bra.  Unfortunately I didn't think to check this before cutting out the back but luckily I had plenty of leftover fabric and was able to cut new pieces.  I fully lined the dress (it looks a little hybrid because I used an old dress lining for the skirt portion and made the top new).  I attached the invisible zipper by hand--it did take forever but I love the result!
This is my first time doing slant pockets and I really like them.  I didn't have a pattern but had checked out a few dresses with pockets like this at Ann Taylor and figured they would be easy enough to make...and they were!  This will probably be my new go-to pocket as I'm finding that side seam pockets on fitted skirts tend to splay open too much.
My next project for the fall is a jacket inspired by this one from Gap.  This will be my first attempt at sleeves and buttonholes so it will be quite a project.

This will probably be my last post for a while as I'm starting a part-time master's program next week while continuing my full time job.  Between school and work I won't have much spare time to spend on sewing, but any projects I do manage to complete I'll post here!

Friday, July 30, 2010

Sleeping Shorts

I was lucky enough to inherit a bunch of fabric from a friend whose mother's friend was cleaning out her sewing closest.  Most of the pieces are small (1/2 yard or less) of quilting fabric but a lot of fun patterns and everything came neatly folded so how could I turn them down?!  Most of them will probably sit in my sewing closet until it needs to be cleaned out, and those that I use will be for linings or pockets or testing ideas (like French seaming in-seam pockets...it works!).  There is actually a fair bit of this cute purple flower fabric, probably a little over a yard, and I thought it would be the perfect print for sleeping shorts.  I did have plans to make some make-shift bias tape out of another patterned fabric but these ended up coming together around 12:30 one night and hemming was just so much easier!
I used this tutorial from MADE with almost no modifications.  The only thing I changed was the length (I just copied some sleeping shorts I already had) and I skipped the elastic around the waist and just used the drawstring.  I must not have added enough allowance on the top because my casing ended up being fairly narrow and I was having a really tough time getting the elastic through.  When I had it about halfway through I realized that there was no way the drawstring would fit with the elastic in, and since the shorts weren't too loose I didn't really need elastic to hold them up, so I went with drawstring only.

I really love this pattern and plan on making a few more sleeping shorts (or pants) for myself with my fabric stash.  It will also be very useful come the holidays as I'm always stumped about what to sew for guys.  But what guy doesn't love a good pair of pajama pants...perhaps in a nice pink floral?

Monday, July 26, 2010

Tie-Front Top

I've been wanting to make a tie-front top for quite a while, since trying one on at Ann Taylor (not available anymore) and seeing this cute dress version from Very Purple Person.  So I scooped up McCall's 5884 at a Joann's sale a few weeks ago and found a great cotton shirting on clearance.  The fabric is very very tiny checks and pale green, not a color I wear a lot but it's so pale it almost becomes an off-white.
I love how the shirt turned out and am so glad I checked out Pattern Review before making it--according to almost all of the reviews the front is cut way too low, and I followed their advice and raised the front neckline almost 3-4 inches.  Thank goodness I did: if I hadn't the keyhole formed by the slit and the tied tie would have been down at my belly button!
I used a new technique (for me) to finish the armholes: bias binding.  I sort of followed Amanda's instructions but I didn't look at them until after I'd sewn the bias tape onto the raw edge, sandwiching it.  The fold under and sew took me a couple of tries but I followed her advice and used lots of pins and went really slowly and pulled the fabric as much as possible and I think it looks great!

I'm so happy with my tie-front shirt and am excited to have mastered the bias binding technique.  After cutting this only took me about 4 hours to complete--and it probably would have been 3 if I'd gotten the armholes right the first time!

Tuesday, June 29, 2010

Chinchilla Bag

This was my little brother's birthday present--he turned 23, not 5, but I think he liked it anyway!  I just made a simple tote bag with lining (its actually reversible since there are no pockets in case he's embarrassed by the orange chinchilla) and did a giant applique chinchilla on the front (he and his girlfriend have the cutest black velvet chin).

Friday, May 28, 2010

J.Crew Look-A-Like T-Shirt

There are so many embellished t-shirt tutorials out there and this one is so easy I almost didn't post it...but I love the way it turned out (in only 5 easy steps!)

I copied this J.Crew t-shirt:
1) Get an extra long t-shirt (mine is from H&M and cost $5).  Decide where you actually want it to hit and cut off the bottom (leaving an extra 3/4-1" for the hem).
2) Hem the bottom (I folded twice but once I did it I realized I really only needed to do it once since the jersey won't fray).
3) Cut the bottom piece into 3 strips of the same length (more or less) and decreasing in width about 1/4" for each one. You'll want to cut off the old hem as well.
4) Ruffle the strips and gather them to approximately 9" long.
5) Stack the ruffles and pin and sew to the shirt in the same position as the J-Crew one.  I highly recommend trying it on while pinned to make sure you like the placement.
Now just press and you're done!

Wednesday, May 26, 2010

Projects

My last few projects have either been from patterns or too straightforward for tutorials.  I made my first (successful) shirt from a pattern, Vogue 8495.
I love the yoke top and especially the sleeves (well way the should piece extends out to a point)!  This fabric is actually the Liberty of London scarf from Target.  They've been getting such great reviews and they're big enough to make shirts!  I got both patterns but haven't decided yet what to do with the darker one.
 My other pattern project was this bag from Lotta Jansdotter's Simple Sewing.  I used another pattern from this book for a gardening tote, and had a bit of a tough time following the written instructions with very few illustrations.  But after having done one pattern from her book I found this one much easier to follow and it took surprisingly little time to complete!
The strip of bias tape here is actually the opening of an outer pocket where you can put a magazine or newspaper.
I used a little of my favorite ginko fabric for the inside pocket.
I also made another skirt/shirt to dress creation.  The top I got at Target on clearance and the skirt came from a Betsy Johnson dress that I found at a thrift store years ago and could only wear as a swim suit cover up since it was huge!  I love the color combination and the dress is very comfy!
And finally now that I've been sewing for 8 months I decided to organize my fabric closet (instead of having piles of fabric hidden around the house in various bags and boxes like some very bizarre squirrel).  I doubt it'll last long but it looks great now!