Tuesday, March 30, 2010

Old Lady Shoe Makeover

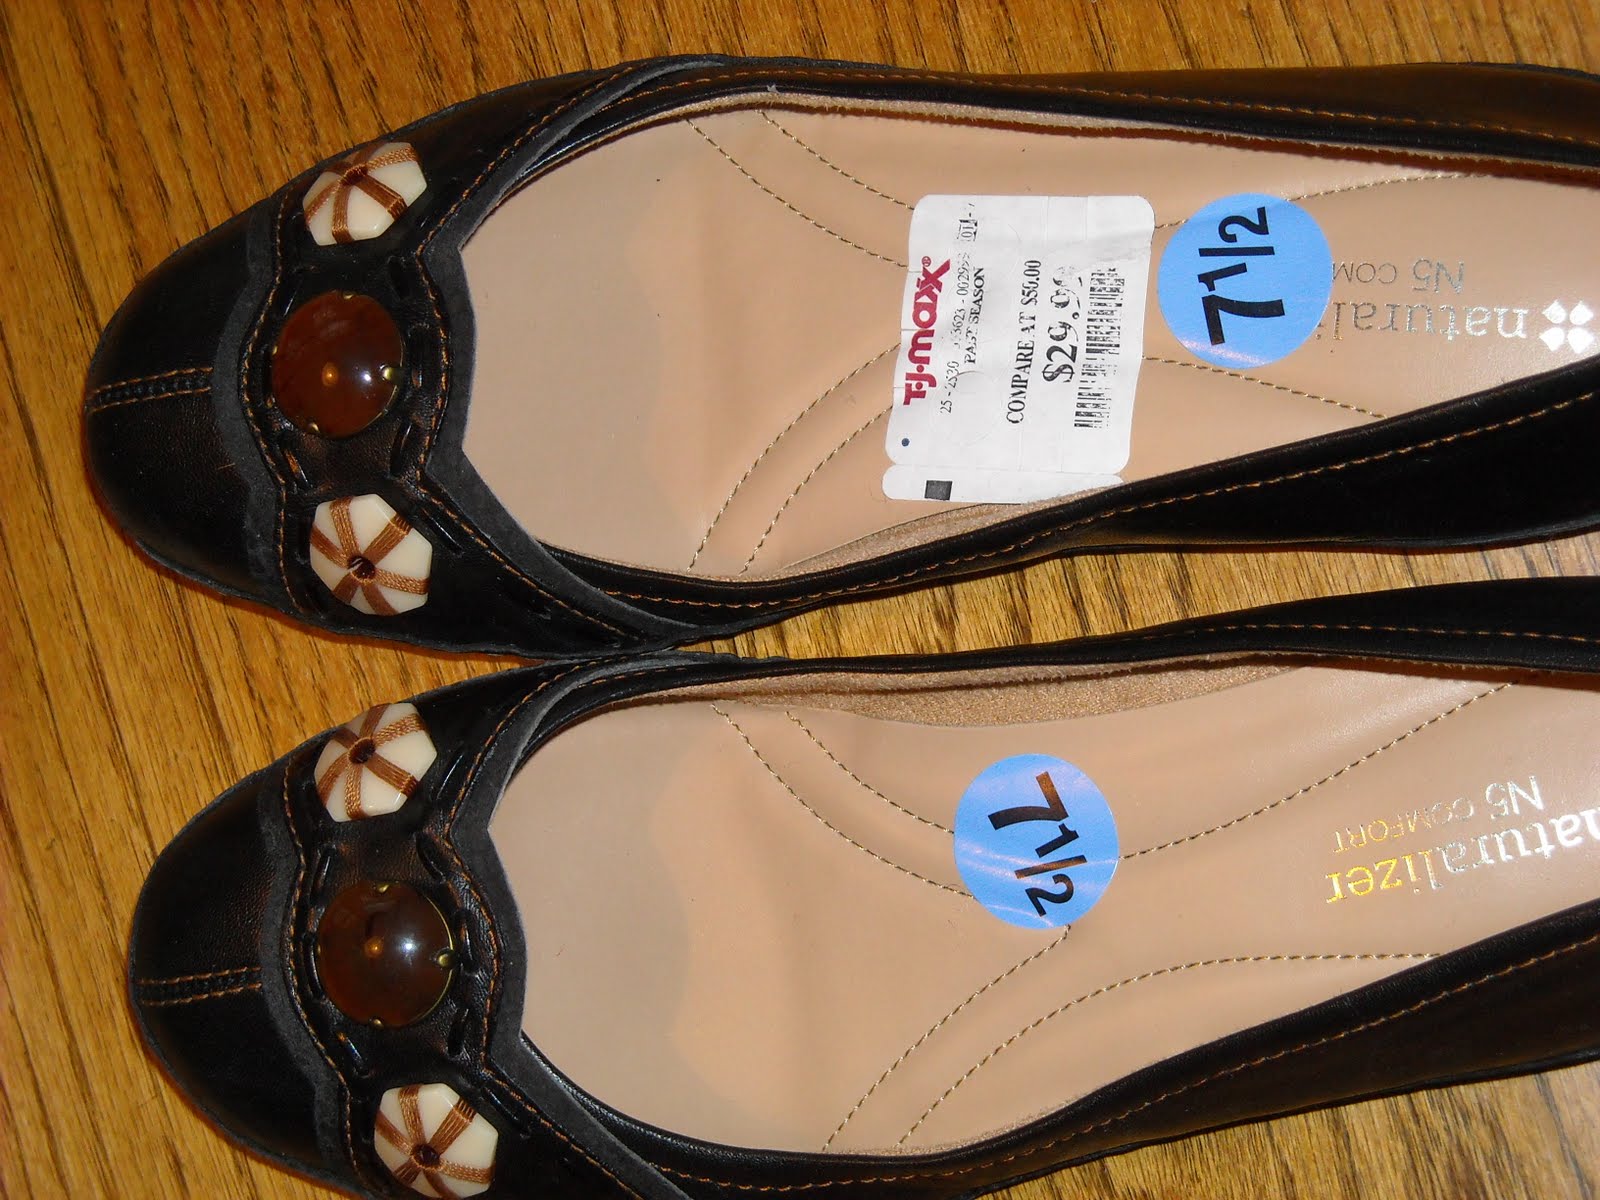
I have the hardest time finding spring/summer shoes that are comfy and cute.  I love slip-on/ballet flat style shoes but lately I've noticed that the lack of support makes my feet ache by the end of the day.  I found these shoes at T.J.Maxx for a very reasonable price.  I like the shape and support but hate the awful fake gemstone things.
So I decided to make them over and was inspired by these shoes:
Blume leather ballet flats from J.Crew

I cut off the stones and made a miniature version of the flower corsage from Made by Lex.  Using my brand new mini glue gun I glued it to the top of the shoe.
The best part of this makeover is that if I get sick of this color/style (or it gets dirty) I can just pull it off and put on something new!  I like this ruffle option as well:

And I think that one large flower with few petals, like the one on this headband, would work well also:
Large flower headband by Made by Lex

Now I'm ready for the 80 degree weather this weekend!
 
PS-After wearing these shoes out one day the fraying got out of control so I sealed the edges with a candle.
PPS-After having worn these for a couple of days I realized that the glue is not enough to keep the fabric on the shoe (the roses however are still firmly attached to the strip of fabric).  There are holes in the leather where the original decorations were sewn on, so I did a few hand stitches to secure the flowers.

Sunday, March 28, 2010

My First Shirt

This is my first real shirt (buttons, sleeves, collar) and I think it turned out pretty well!  I used Simplicity Pattern 2601 and am obviously still not used to the sizing differences-again I was cautious and cut the fabric much bigger than I needed, especially for the back piece.  It was too big around the waist but I was able to put in a couple of darts in the back and it looks just fine and fits well.

This was also my first use of French seams.  The fabric definitely needed them as it frayed very easily and was sheer enough that you could see through to the seams.  I used this tutorial from Freshly Picked to get started and once I had done the first few it got pretty easy (although when attaching the lower sections of the shirt I had to repin a few times before it lined up correctly).  I really like the look of the French seams and am going to try to use them from now on--the extra ironing is a pain but in the end the inside of the piece looks so much better!
I also used bias tape to cover the neck and front (as in the pattern) and also on the seam where the sleeves attach to the shirt.  Unfortunately I didn't realize how much fraying had already happened when I got to this point and ended up with some frayed parts showing beyond the bias tape.  I was able to trim most of them and the rest will disappear over time (I hope).
If I were to make this shirt again the only thing I would change would be the width of the panel with the buttons.  It's a bit too narrow and when I'm wearing the shirt little gaps show between the two sides, nothing a few safety pins can't fix, but it is kind of annoying.  Overall I'm very happy with my first shirt attempt and can't wait to make another (my next one will be from my new sewing book: Sew U by Wendy)!

Wednesday, March 10, 2010

Quick Tote Bag

I've been wanting to do something with this great canvas print fabric every since my boyfriend's mother let me raid her fabric cabinet at Thanksgiving but hadn't found the right project.  In my 6 months of sewing I haven't made a bag yet and was in the market for a nice new tote bag.  I found this tutorial from Cicada Daydream that seemed simple and close to what I wanted.  I just made 2 changes: 1) I made mine bigger (her sides are 13x14 before sewing and mine were 20x21) and 2) I added an inside pocket.
I love how the bag turned out and the pattern and rich purple together.  The only thing I don't like is the fact that the bottom is pretty saggy (as you can see in the first picture).  Next time I make a bag I'll try to do a more structured bottom. This was a great first bag project: fast with clear instructions and a great result!

Very Poofy Skirt

I finally had time to make my elastic waist skirt with my purl fabric this weekend.  I'm fairly happy with how it turned out, but I'm still trying to get the poofiness to go down!  I got really in to it and didn't take any pictures during the process but check out the great tutorial I used from Freshly Picked.  The only change I made was to cover up the elastic, like this J.Crew skirt:

 
I made the skirt more or less following the tutorial directions but instead of sewing the fabric to the elastic I folded the top over to create a pocket for the 2 inch wide elastic.  Looking back I really should have just placed the elastic and then folded the fabric over and sewn, but I decided to create the pocket first and then string the elastic through, which was of course time consuming and frustrating.  But in the end it worked.

I had to line the skirt, and I did so once the rest was finished.  I just sewed the 2 vertical sides of lining fabric together and then sewed them to the skirt at the top, right at the bottom of the elastic pocket.  The pockets are between the blue fabric and the lining (I checked some of my other dresses/skirts with pockets and this was the most common way of doing pockets and lining).

The skirt started out very poofy and I've been pressing and ironing to calm it down a bit.  I like some poofiness but it felt a bit like a tutu at first!  If I were to make this again (which I'm sure I will it was so simple!) I think I would use 1.5 times the length of elastic for the fabric, instead of 2 times as suggested in the tutorial.  I'm so happy that I finally know how to make pockets...it's really quite simple and I will now be putting them in all of my creations.

Monday, March 1, 2010

Dress to Skirt and New Fabric

I was 90% finished with my Simplicity dress (just needed to attach 1 sleeve and hem the bottom) when I tried it on for the 20th time and realized the the bodice was just too big and that short of detaching it and redoing all the hems and darts nothing I could do would fix it.  I also decided that I don't really like the large pattern all over, so I've decided to make the dress into a skirt.  I promised to give it 48 hours before making the cut but it's already been 24 and I'm only more convinced.  I think it will be easy to turn in to a skirt and the pockets will still look cute.

I also got some amazing fabric at purl this weekend.  That place is incredible...I could have spent all day (and all my money) there! 
I got this cute light cotton blue fabric with pink stripe around the bottom that I'm going to use to make a really simple spring skirt using this tutorial from Freshly Picked but shorter and with a thicker elastic band like this J.Crew skirt:
 
I can't wait for spring!

Wednesday, February 24, 2010

UPDATE--Next Project: Spring Dress from Simplicity Pattern

I've almost finished this dress (just need to add the sleeves and hem the bottom) and I've been really disappointed by the pattern.  It was impossible to understand the directions as to how to attach the pockets so I just ended up making something up on my own.  It worked fine but they don't lay as flat as I'd like.  I have, however, discovered my new favorite sewing trick: binding tape!  I'd never used it much before but had a packet lying around and decided to use it on the hems with the zipper, since the fabric was fraying a lot and kept getting caught in the zipper.  It makes it look so nice and finished!  I ended up putting it around the neckline as well (I had some problems with the liner) but I'm not sure yet if I like it...I'll have to wait until the sleeves are on to know for sure.  It'll end up being a cute dress but I'm glad I'd already used a dress pattern before, otherwise I would have been completely lost!


As I've mentioned a few times recently I kind of went overboard at the last Joann's sale and got a bunch of patterns and fabric.  My next project will be this dress with the sweetheart collar and cap sleeves (just like the picture on the left, but probably without the buttons.)  I love pockets in dresses and am really excited to learn how to make them!
 
I cut out the pattern pieces Monday night (even though I'm a 4/6 in real life I appear to be a 12/14 in pattern world!) and cut all the fabric last night so I'm ready to start sewing!  I'm using a great Simply Silky print from Joann that was 50% off on top of already being on clearance...it's a large print that kind of looks like brushstrokes in blue, brown, purple and yellow (hard to describe but very cute).  I realized after cutting the fabric that I didn't allow for matching the pattern where the 2 parts of the back meet, so hopefully it won't look weird!

Sunday, February 21, 2010

Marc Jacobs-inspired Rosette Jersey Skirt

 
I love this skirt!  It was really simple to make: the only time-consuming part was making the flowers and even that was made easier by the fact that everything is jersey, so you don't have to finish anything!  I used a heavy weight jersey for the skirt itself since I wanted it to be warm enough to wear this winter, and a light jersey for the flowers, so they were easy to sew.  The only real problem I ran in to had to do with the shape of the skirt, and that was easily fixed.

I started by cutting 3 rectangles: 1 for the body and 2 for the top and bottom.  Here was where I messed up: I didn't think about the fact that I didn't want the skirt to be the same width at the waist as as the bottom.  As you can see in the actual picture it's more of an A-line, although a slight one.
To fix my mistake I ended up adding a triangular panel in the back that added about 6" to the bottom hem, but kept the top the same width.  Here's what it looked like when I was getting ready to attach it to the rectangular panel:
This problem could have been avoided if I'd stopped to think and either a) cut a large rectangle as wide as the bottom needed to be or b) cut a trapezoid.  But this worked just fine and you don't really notice the back panel.
Here were the final measurements for my 3 main pieces:
Body panel: 36"x15" plus triangle 6"x15"
Top piece: 36"x5"
Bottom piece: 42"x5"

Next it was time to ruffle and pin and sew and ruffle and pin and sew...35 flowers total!!!  I cut the strips 24" long and about 1/2"-3/4" wide.  I didn't worry about them all being exactly the same thickness or exactly the same length once ruffled.  Once the strips were ruffled I pinned them to the skirt, using as many pins as possible to keep them in place while I sewed them on.
 
This part was definitely slow going.  I would recommend putting the rosettes as close together as possible...touching or almost overlapping.  I left a small space between each of mine and when the skirt is on it stretches and they're further apart.

Once all of the rosettes has been sewed on came the easy final steps: attaching the bottom and top.  I couldn't tell on the original but I thought that they looked thicker so I decided to fold the fabric in half and have strips of about 2 inches (although after trying them on once pinning I preferred a slightly smaller piece on the bottom, about 1.5").  This also had the added advantage of not having to do any hems!  I just folded the long piece in half lengthwise (wrong sides together) laid them on the body of the skirt (right sides together) sewed together with a stretch stitch and trimmed off any extra!  Finally I folded the skirt in half (right sides together) and stitched up the last hem--I just used a straight stitch for this since the skirt won't be stretching lengthwise.

A word about working with stretch fabrics: think long and hard before you cut about which way the skirt will be stretching.  Twice I cut too soon only to realize that the fabric was stretching lengthwise, not along the width as I wanted it to.  I'm sure this is something you get the hang of the more you work with fabrics like jersey but I'm not quite there yet.

I can't wait for the "warm" weather this week (45 degrees!) to wear my new skirt!
 

Update: After pressing the hems I realized that the waist of this skirt is way too big.  The flowers make the skirt fairly heavy so you need a pretty tight waist (using the jersey's natural stretch) to hold it up well.  I'll do some re-hemming of the back hem or maybe some darts tonight to fix it.

Up next: Joann's just had a huge sale and I got a bunch of patters and fabrics--more spring/summer appropriate but it'll get warmer soon, right?  I also have another shirt makeover in the works that should be up soon.